Tag Archives: 2009

Kitchen floor

The kitchen floor before refinishing

The white vinyl floor didn’t look terrible, but it was vinyl. So it had to go.

We successfully ignored the vinyl floor in our kitchen for two years. It wasn’t offensive (although the white did tend to show dirt quickly). It even matched the tile backsplash. But floor in the living room appeared to run interrupted underneath the vinyl, suggesting the fir continued into the kitchen. While my wife was out of town for a week, I pried up the transition strips, slid a putty knife under the vinyl and tore up a strip while hoping the fir didn’t end butted up against a sheet of plywood or had rotted.  Continue reading

Limbert No. 238 Tabouret


Limbert's No. 238 tabourette reproduced in cherry.

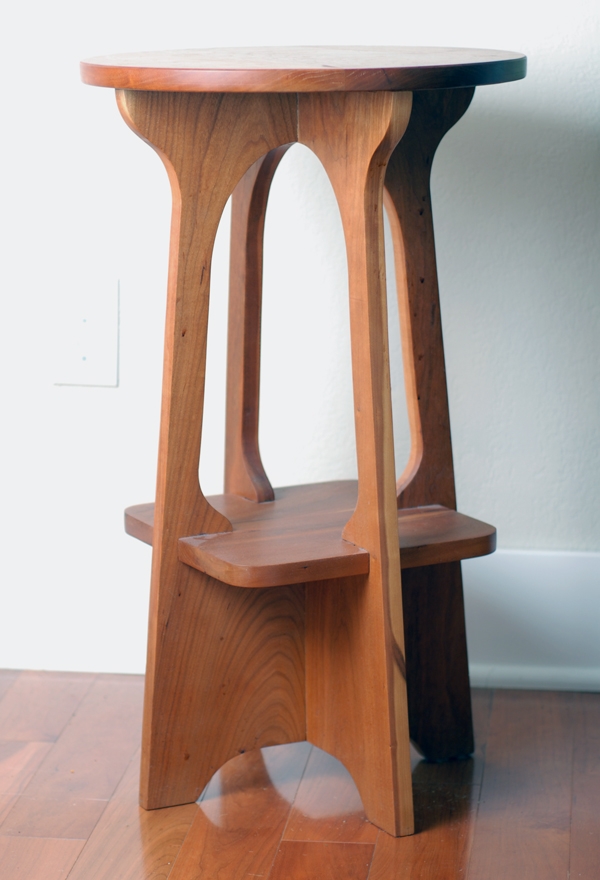
Limbert’s No. 238 tabourette reproduced in cherry.

The original version of this side table sold for $7.00 in Limbert’s 1905 catalog. Like other of Limbert’s best pieces, its design transcends the period, making it a bit of chameleon at home with many styles. The original was built of quartersawn white oak with a fumed finish. I chose to build it in cherry following an article from the November 2003 issue of Popular Woodworking.

The project provides a fine introduction to pattern routing since each leg is identical. The article calls for arranging the rabbeted legs in a pinwheel pattern, which makes for an awkward glue up since the parts want to slip when clamped. If I were building another (easy enough to do with the pattern prepared), I might rabbet both sides of each leg to produce a centered tongue, then assemble in stages, beginning with gluing two opposing legs together and finishing by gluing the remaining legs in the grooves formed by the meeting of the opposed tongues.

I began by selecting the best wood (“best” a relative term for the mediocre stock I had on hand) for the top, gluing it up. I then marked out the legs, cut out rough blanks, and used a bearing bit in the router guided by the pattern to cut the legs to final shape. I sanded through 400 grit, taped off the joints, and applied a couple of coats of boiled linseed oil. After glue up, the top was attached using brackets.

More Information

Model in the Sketchup Warehouse

Popular Woodworking’s Arts & Crafts Furniture (Amazon link) collects some of the magazine’s most popular Arts & Crafts projects, including this tabouret.

Fence–Construction

One of the side sections. Deciding how and where to adjust the fence to meet the slope of the yard required quite a bit of head scratching.

One of the side sections. Deciding how and where to adjust the fence to meet the slope of the yard required quite a bit of head scratching.

To keep fence construction manageable we tackled the three sections (two sides and back) one at a time. Construction began with a materials list–gravel, concrete, pressure treated posts, cedar, and stainless steel screws–and a trip to Mill Outlet Lumber. Then it was time for demolition. Taking a chain link fence down is relatively easy, but posts set in concrete are another matter. If the posts weren’t located where new posts would go in, I cut the posts off with a reciprocating saw where they met concrete. Digging out the posts that had to go was less pleasant.

The fence in potentia

The fence in potentia.

There’s a surprising amount of debate online about whether posts should be set in concrete or alternating levels of dirt and gravel. I opted for a base of about 6 inches of gravel in a thirty inch posthole, then concrete. To avoid showing the perforated faces of the pressure treated posts, they were wrapped in cedar once the concrete had set. To avoid visible fasteners, I screwed the fence rails to the posts using pocket holes drilled with a Kreg jig. With the rails in place, the infill went in fairly quickly.

In another departure from the source design, only a few sections were topped with the gable roof. To produce the gable, two boards were butted together at a 90 degree angle and screwed together. Other posts were capped with a simple 7″ x 7″ beveled cap. I ripped a 2″ x 8″ to width, then cut it into squares. The bevel was cut on the table saw with the blade set to about 7 degrees. After sanding, the caps were fastened to the posts using silicon caulk.

The back section of fence.

The back section of fence.


Fence–Design

Functional but ugly.

Functional but ugly.

I thought about fences for what seemed like years, looked all over for inspiration, contemplated material lists in Manila, shot promising examples in Japan. We were replacing a 40 inch cyclone fence and wanted something more appealing than the typical lattice over board infill designs popular in the area (imagine pressure treated 4×4 posts, pressure treated 2×4 rails, 1×6 cedar infill to 5 feet and a foot of 2 inch lattice above), although anything would have been an improvement over the chain link.

Requirements:

  • Suitable for the house
  • Wood
  • Scaled for a small yard
  • 6 feet high with a ~5 foot privacy panel and ~1 foot lattice top
This design featured in a California Redwood Association brochure provided the starting point for our design. Source.

This design featured in a California Redwood Association brochure provided the starting point for our design. Source.

It was surprisingly difficult to find something we liked (see here and here for useful resources). In the end, we modified a design featured in a California Redwood Association brochure. The six-foot high fence consists of alternating panels of of four- and eight-foot length supported by four-by-four posts. Alternating wide and narrow boards (wide-narrow-narrow-wide) compose the privacy section of each panel, but the tops of the short and long panels differ. The short panels feature a simple vertical and a gable tops the long panels. We liked the alternating gable tops and the use of wide and narrow boards but used panels of the same length, spacing posts 6 feet on center to suit the size of the yard.

Concept drawing for the fence.

Concept drawing for the fence.