Category Archives: tools

Shaker Workbench

A workbench from the Hancock Shaker Village. Note the square dog holes in line with the tail vise.

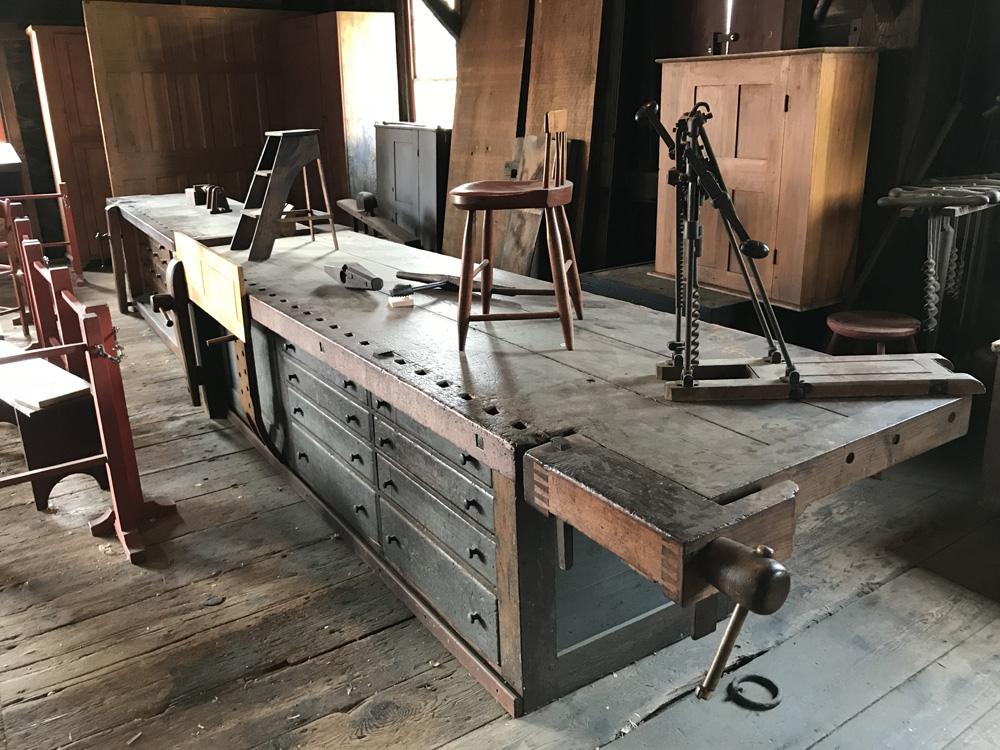
I can imagine a happy retirement volunteering in the cabinet shop at Hancock Shaker Village, if only because it would allow working at one of the shop’s massive workbenches. These benches are typical of the form, with a wide top over a storage base. A tail vise and leg vise (supplemented by a sliding dead man) provide workholding.

My personal bench is a scaled-down version of the Roubo as documented by Christopher Schwarz in an issue of Woodworking Magazine and later in Workbenches: From Design & Theory to Construction & Use. It has served me well, but there are times when I would prefer enclosed storage rather than its single open shelf.

Pumpkin Carving Tools

pumking carving tools

Pumpkin carving arsenal

I thought it might be helpful to identify the tools I’ve found helpful carving jack-o-lanterns. While we abused various kitchen knives growing up, specialist tools can make carving safer and simpler while sparing your good knives. From left to right and back to front in the image above:

  • Rubbing alcohol: clean Sharpie ink from pumpkin skin.
  • Sharpie permanent markers: mark up a pumpkin for carving.
  • Utility knife (or X-acto): cut pumpkins precisely.
  • Serrated carving tool: primary tool for removing sections of pumpkin (though I’ve been tempted to use a jigsaw for large removal). Often available at the grocery store around Halloween.
  • Carving gouges: carve the pumpkin. I bought this set of carving tools years ago and have used them more for carving pumpkins than wood. The gouges of various widths and shapes are useful for carving lines pf varying weights into a pumpkin or removing skin to allow light to shine through.

Paint Shaver Pro

Shaved siding

The Makita Paint Shaver Pro removes paint quickly from flat surfaces but has the potential to gouge material.

I spent a fair amount of time this summer stripping the front of the house to prepare it for painting using a variety of techniques, including chemical strippers and infrared heat. When I mentioned the project to a co-worker, he offered to lend me Makita’s Paint Shaver Pro. I gladly accepted the offer. The Paint Shaver Pro is an angle grinder with a carbide cutting head that grinds paint (and wood if you’re not careful) as you move it across a surface. Paint removal with the tool is fast, especially compared to other stripping methods, but that speed comes at a cost. Continue reading

Mirka Ceros 5-inch sander

Mirka Ceros

The Mirka Ceros 5-inch sander offers the utility of an air sander with the convenience of an electric.

One of the fringe benefits of my trip to the Popular Woodworking shop was the chance to try new tools. While Felder’s K3 Winner sliding table saw is sadly too large for my shop, I did enjoy the Mirka Ceros sander. It offers the light weight and low center of gravity of an air sander without the need for a large compressor. The top-mounted paddle switch took some getting used to (I kept setting the sander down on its top and turning it on), but the sander was comfortable in extended use. The Abranet sanding disks cut quickly, though I found them brittle when sanding where to pieces of wood joined: the edge of disk seemed to wear quickly if it got banged up, but cost is likely the tool’s largest drawback–MSRP is $525 for the sander and power unit in a Mirka-brander Systainer–though it doesn’t seem horribly unreasonable for the experience.

Shaker Peg Board

shaker peg board.

A three-inch strip of lightly-chamfered and painted poplar serves as the base of the peg board.

I’ve wanted some method for storing yard implements for some time, but I wanted something with more appeal than the utilitarian plastic and metal options available. I finally decided that Shaker peg board would make a nice alternative. I ordered some maple pegs online, but only afterward did it occur to me that even my best free-hand drilling attempts were likely to leave the pegs at least slightly off-center and a bit splayed. So I deferred and other projects intervened until I had access to a drill press and was ready to build. Consulting Thomas Moser’s How to Build Shaker Furniture and John Shea’s Making Authentic Shaker Furniture, I decided on a three-inch wide board with the pegs set 6″ on center.

Actual construction went quickly. After ripping some poplar to width, I planed away the machine marks on the show side of the board, ran a chamfer around its perimeter and hit it with a quick pass of 220 grit sandpaper before priming and painting. I then marked the location of the pegs using dividers and a square, then drilled them out with a 1/2″ Forstner bit. I had contemplated different fastening techniques, ranging from a French cleat, to plugged screw holes, when it occurred to me that  each peg was an effective plug. So I drilled pilot holes in every few peg holes, positioned the board on the wall, and marked the concrete wall. Even with a hammer drill, it took some time to drill holes for masonry anchors. With the anchors finally set, I screwed the board to the wall and tapped the pegs into place with a wooden mallet.

Tansu-Inspired Tool Chest–Construction

Detail of a tansu-inspired tool chest.

Modern construction techniques belie a design inspired by tradition. Locking miters join the case and dadoes house the many dividers.

With the front of the case divided into doors and drawers, I was ready to begin construction. Construction of the cabinet provided an opportunity to clear out the 1/2″ cherry veneer plywood I’d accumulated over the course of several projects. Continue reading

Tansu-Inspired Tool Chest–Design

tansu tool chest

The asymmetrical layout of tansu provides inspiration for this tool chest.

The footings of my foundation extend inward about 16 inches at the back of my basement, forming a shelf-like space below the window behind my workbench. It’s a convenient space, but it tends to collect everything–tools, glue, fasteners, dust, etc. So I’ve been contemplating another tool chest build to fit the space (roughly 12″h x 38″w X 12″d) for some time. Since I’m in between projects, it seemed like a good thing to do; it would also let me clear some of the cherry plywood leftover from my last couple of Mid-Century Modern Builds. Since I’m also working on a class on tansu design and construction for Popular Woodworking University, I’ve had asymmetrical case design on my mind. After some iterating in SketchUp, I think I’ve settled on this basic layout: cupboard on the left, many drawers on the right. Many drawers. Many, many drawers . . .

Carving the Betsy Jack o’ Lantern

betsy jack o' lantern

Betsy, a Curious George character, incarnated in pumpkin.

The question about what skills are transferrable from woodworking comes up on occasion in online discussions. Certainly the ability to measure, mark, and cut to that mark apply to a lot of crafts, and sometimes in unexpected ways. Take pumpkin carving. When asked what kind of jack o’ lantern he wanted, my son Peter replied “Betsy.” Betsy, for the uninitiated, is a character from the animated adaptation of the Curious George books. Peter gets points for originality, but I wasn’t sure I’d be able to deliver.

An image search provided a suitable screen grab of Betsy. To transfer the image, I cut out the face and hair and traced them with a black Sharpie, then punched a toothpick along the details of the face and connected the dots. After clearing out the pumpkin, I drilled out the eyes with an appropriately-sized bit and used a pumkin-carving tool to define Betsy’s eyebrows, nose, and mouth. The hair presented more of a challenge. I first used a V chisel to define the outline of the head and hair, then used a gouge to scrape off the pumpkin’s outer skin within the hair outline. The results at least passed muster with a three-year-old.

Basic Electrical Kit

A basic electrical kit

Clockwise from upper left: Cable stripper, current tester, wire caps, wire stripper, headlamp, plug tester, adjustable screwdriver.

I don’t have many specific toolkits, and I certainly don’t move in the lofty organizational circles of people posting in the systainer section of the Festool Owner’s Group, but I do have a basic kit for electrical work around the house that lives in its own canvas bag. It’s very convenient to pull the bag out when I have a quick job like switching out lights.

The basic kit includes wire cutters/strippers, a current tester, three-prong outlet tester, wire caps, adjustable screwdriver, and needlenose pliers. For more ambitious work like new circuits or outlets, the kit gets supplemented (metal fish tape, fiberglass fishing rods, a key hole saw, drill bit extensions, etc.), but the basic kit covers a lot of ground and isn’t so expensive that I have money tied up in something that doesn’t get used often.