

Butt-joined cedar 1″ x 10″s form the foundation for the ridge cap. Three layers of cedar shingles top it off.
I’d balked at using the polycarbonate ridge cap also made by the panel manufacturer, a decision I had cause to question as I assembled the ridge cap. I’d decided on a cedar cap, two wide boards joined with a simple butt joint, and originally intended to clad it in copper. A quick look at copper prices sent me looking for other options. It seemed like a good time to use the bundle of cedar shingles I’d purchased for the fence build but didn’t end up using.
I began by ripping a bevel on both boards, and act of geometry that almost defeated my limited mental faculties. To produce the 110-degree angle at the roof peak, I needed to rip a 70-degree bevel along the ridge cap boards. The table saw does not cut at 70-degrees. Stand a board on edge and rip it at 20-degrees, though, and you are left with a 70-degree bevel. After ripping the boards to final width, I drilled some pocket holes and brushed on the glue and screwed the whole thing together.
When the glue had dried and nailed a couple of courses of shingled down, then contemplated the ridge. You can buy pre-fabricated cap shingles in cedar. They’re beveled and stapled with enough flex to accommodate varying roof pitches. Or you can make your own.
As it turns out the butt joint that transforms two on-edge shingles into a single cap is tapered as well as beveled. My attempts to reproduce this cut using any combination of machinery available to me failed–miserably. I realized, though, that I could position each shingle individually, nail it in place, then trim the top edge and plane it to the correct bevel to achieve the beveled taper cut I needed. At that point, a wise man would probably have opted for the prefab caps, but I’m not especially wise. I nailed, I made rough cuts with the jigsaw, I planed to final size with the blockplane, I brushed on a little glue, and then I laid the other shingle down. Rinse, repeat, and be glad the cap is only ten feet long.
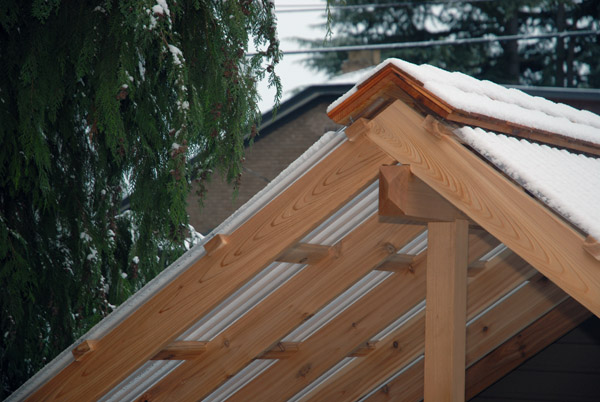
Screws through the bottoms of the purlins anchor the ridge cap in place. Just in time for some snow.
Pingback: Timber Frame Porch--Complete | 1910 Craftsman